

Disney+ is a streaming service with a wide array of movies and videos that users can stream online. With the cross-device compatibility that Disney+ has, you can access your Disney+ account from many devices.
You may want to create multiple profiles and share a Disney+ account with friends or family to cut costs. Creating multiple profiles on your streaming account doesn’t just help keep your watchlist separate. It can stop other users from messing with your recommendation algorithm.
Disney+ currently grants subscribers the ability to create up to seven separate profiles under the same account. You can make changes to these profiles at any time, whether you choose to do so on your desktop or mobile device. This article will cover how to create and edit Disney+ profiles.
The primary profile for your Disney+ account is automatically created during the sign-up process. It cannot be deleted or set to a Kid’s profile.
To create a new profile:
1. Select your profile:
2. Select (+) Add Profile.
3. Select a character icon for your profile.
4. Enter a profile name.
5. Select Done.
When watching Disney+, make sure you’re using your own profile to keep things personalized. If you notice you’re using somebody else’s profile, you can switch to yours by following the steps below:
1. Select the profile currently in use:
2. Choose the profile you want to switch to from the list of available options.
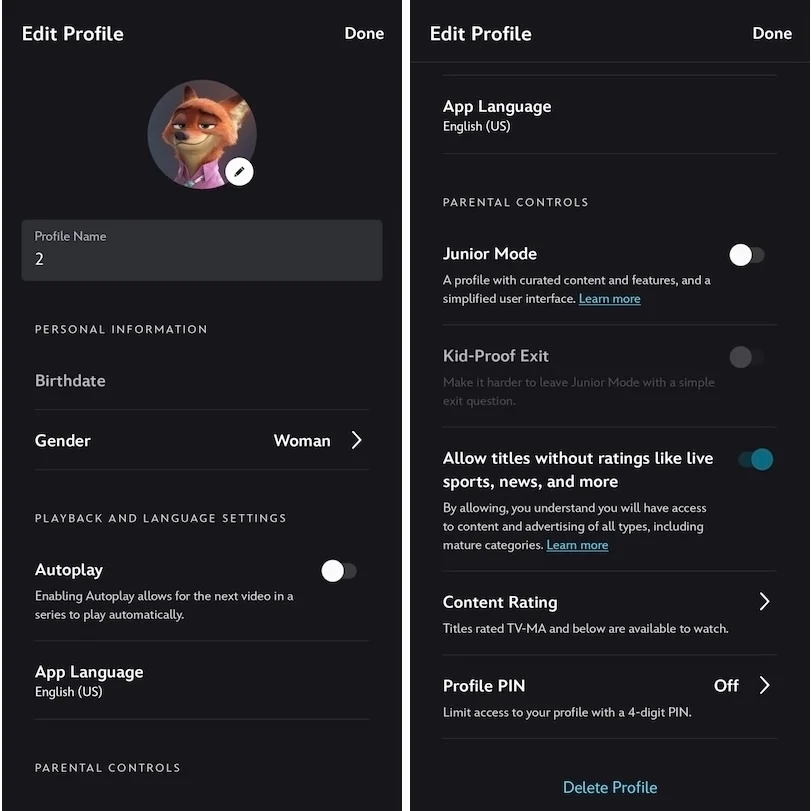
Manage your profile’s playback and language settings, feature settings, and parental controls using the steps below:
1. Select your profile:
2. Select Edit Profile.
3. Select the profile you want to edit.
4. Adjust any settings you would like to edit including:
5. Select Done.
Deleting a profile is a permanent action: that profile cannot be recovered. If you’re ready to say goodbye to a profile, follow the steps below:
You can easily create a kid’s profile on Disney+. Marking a profile as belonging to a child automatically restricts the content they can access and provides them with curated content and features. Plus, the interface is simplified for easier access.

You can set the content ratings on standard profiles — by doing so, the profile will only allow content with that rating or below to be viewed. You can adjust content ratings on standard profiles by heading to your profile settings.
Set a 4-digit Profile PIN to restrict others from accessing your profile on Disney+. Anytime you switch profiles or launch Disney+, you have to enter the PIN for extra safety. You can manage your PIN at any time from the Edit profile screen.
If you can’t remember your PIN, select the “Forgot your PIN?” option when you’re prompted to enter it — once you verify your account by entering your password, your PIN can be reset.
You can prevent other users from creating new profiles on your account with profile creation restriction. Once enabled, a password will always be required when creating a new profile. To turn on profile creation restriction, follow the steps below:

You can sign up for a Disney Plus account with the cost of $11.99 per month to get access to a massive library of on-demand shows and movies. Disney+ offers a download function that allows you to save Disney+ content for offline viewing. However, you should log in to Disney+ at least once every 30 days. That means you have to keep your Disney+ account active to access your downloads. Additionally, you can only watch the downloaded videos within the Disney+ app during the subscription period. You can’t save Disney+ videos to your computer after canceling the subscription. If you want to keep your downloads forever and watch them offline on any device, you may look for a way to get rid of these limitations. Is it possible to get rid of all these limits? Surely, here we will introduce Pazu Disney+ Video Downloader in detail. You can use it to download any video and keep downloaded videos on your computer forever.
Pazu Disney Plus Video Downloader is a professional video downloading tool for Disney Plus videos that can download any movie and TV show from Disney Plus in MP4 and MKV formats. Pazu Disney Plus Video Downloader allows you to search for the wanted videos by title and URL. What’s more, Pazu Disney Plus Video Downloader supports downloading videos in HD quality with audio tracks and subtitles kept in all languages. It also lets you save the subtitles into three types: internal, external, and hardcoded subtitles. If you would like to save Disney+ videos forever, Pazu Disney Plus Video Downloader is the one you cannot miss. In the following, we will walk you through the process of how to use Pazu Disney Plus Video Downloader to save Disney Plus videos forever on your computer.

Download Disney+ movies & TV shows to MP4 with HD quality.
The following is the detailed tutorial to download movies and TV shows from Disney+ with Pazu Disney+ Video Downloader.
Download, install, and launch Pazu Disney+ Video Downloader on your Mac or Windows. Select Disney and log in to your Disney+ account.
Click the Settings icon > “Register” and enter your registration code to unlock the full version if you have purchased a registration. If you haven’t, go ahead with the free trial version.

Click the Search tab at the top, type the movie/TV show title in the search field, and click the search icon.

Or copy and paste the link from the Disney+ web player. Pazu Disney+ Video Downloader will search for the content quickly and display the most related videos on the interface.
Click on the Settings button in the upper right corner and select “Preferences.” Here you can set the output format as MP4 or MKV, choose the video codec, and select the language of audio tracks and subtitles as needed.

Pazu Disney+ Video Downloader allows you to select specific audio tracks and subtitles for downloading.
If you are downloading a movie, there is a Settings icon next to the Download icon. Click it to choose the exact audio and subtitle languages. Click on the Download icon to start downloading the movie.
If you are downloading a TV show, click the download icon. You will see all episodes and the Setting buttons on the pop-up window. You need to select the episodes you want to download and click the Settings button to choose the exact audio and subtitle languages, then click the Download button.
Then click the Download button in the bottom right corner. The downloading begins.

Related articles

Download Disney+ movies and TV shows to MP4/MKV on your PC/Mac